I have to say….this is not be finest moment as a photographer….these pictures were taken last September…at night…many by kids….we were in a “getter-done” mode if ya know what I mean. But….the costume turned out so cute that I wanted to share.
I was visiting Melissa last September…and we had planned to do these costumes all weekend…but like usual the time flies by and we realized the night before I left that we hadn’t even started. (by the way….the next morning I was flying around 9:30am and I woke up with the stomach flu….it. was. awful….worst flight of my life…moving on…)
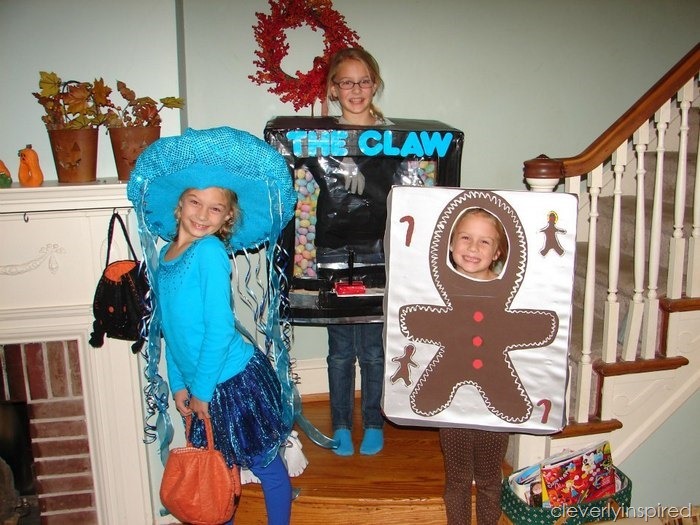
This Claw Machine costume was thought up by my little friend Abby. She is the oldest of Melissa’s daughters and she is really creative. It was our job to tackle this costume together….we shopped Michael’s…shopped around the house…and put it all together. I am going to remember as best as I can to share with you how we put this together….if you have any questions just ask and I will try to help…or just I can just call Abby and ask her:)
")
Three of the sweetest girls I know….
")
Ok..here is what you will need….
Supplies
– cardboard box large enough to have child inside
– razor blade
– sharp scissors
– piece of foam board
– pencil
– measuring tape
– small paper box (square)
-hot glue gun and glue
-craft foam (2 sheets cut into 4 by 4 square)
-duck tape to match foam (ours was red)
– small dowel rod (5 – 6 inches long)
– small wood disc (or something of your choice for “buttons” on the front of machine
– cellophane for front
-wrapping paper (candy paper) to decorate back of the machine
-Abby wrapped hers in black paper but you could probably spray paint the box
– wooden letters “the claw” for front of box
-Abby held a small bag of candy but a fanny pack would work great (when kids placed a “coin” in…she would move the “claw” her hand to grab candy…and place it in the little box to dispense. Hope this is making sense:)
Steps (as best as I can remember…)
1. Cut box on the top to fit child’s head. Measure and cut out arm holes also. Make sure it fits ok.
2. Cut out front of machine with a razor….leaving enough room on the sides so that the box is still 4 sided.
3. Cut a piece of foam board for the “control panel”. Ours is about 12 by 5. Be sure to leave it wide enough to hold your “joystick”.
4. Cut a slit under the front opening. Secure piece of foam board with hot glue.
5. Make the joystick. Stack the 4 by 4 pieces of foam together. Take a sharp razor and cut a deep slit for the dowel rod to be placed. Glue and duct tape the joystick together. Glue dowel rod (and tape). We covered our dowel rod with black duct tape.
6. Cut a slit for the small square box. You need to make sure you cut it tight enough to hold it on it’s own….but also so that it is able to slide in and out.
7. Decorate the box as you like….
")

If you would like to see the JellyFish and the Cookie On a Pan….I already shared those…
Melissa tells me that this claw machine was the most popular costume….all the kids wanted to try it!