This is a sponsored post. The kind folks at True Value have asked me to share a fun summer project with you. I have been compensated for my time and efforts.
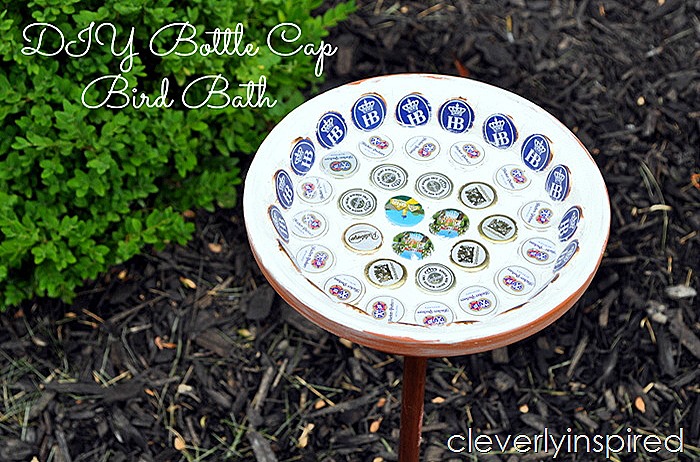
There are so many fun projects that call for bottle caps. After I saw a few projects online I wanted to try one out for myself. This inspired my bottle cap birdbath project. I am partnering with the True Value again for this year’s DIY blog squad. So thankful to have such a great partnership with them! I thought that this outdoor garden project would be fun to do this summer…get the kiddos involved….it is that easy:)
I found some really unique German beer bottle caps on eBay. I think I paid $3 for the whole lot. You can find bottle caps that are particular color or style just by searching on Etsy or eBay. I am sure you’ll find something that you love. This bird bath is probably good for just one or two small birds but at the same time it is a conversation piece for your garden. The supplies are pretty simple and can all be found at your local True Value Store.
cv")
Here is what you will need:
2 foot copper pipe
1.5 inch metal washer
12 inch round terra cotta pot base
bottle caps
unsanded grout
sponge
water
rubber gloves
hammer
paper towels
outdoor clear sealer
Steps:

")
* collect and organize bottle caps and create your pattern
*glue the washer and end cap on the bottom of the planter bas, let dry
* starting in the center, spread the glue and start adhering bottle caps
* continue to work your way to outer edge. Allow to dry according to glue instructions (I left mine overnight)
*mix up grout with water so that it is the consistency of icing
*using rubber gloves, spread the grout on the bottle caps. Get in the crevices and smooth with your hands all the way to the edge.
*using a damp sponge, wipe excess off let dry. (it is ok if some grout is filmy on the bottle caps, you will be able to wipe clean)
*when grout is dried, wipe off and clean up bottle caps well.
*apply a clear coat to protect
")
Find a spot in your garden and hammer the copper pipe into the ground. Top with your new fancy birdbath!
")
*hammer copper tubing into ground
*slide the birdbath on top
*fill with some water for your feathered friends;)
How stinkin cute!?! Am I right?!? I could have made a bunch of these…it was so fun and very easy. Be sure to check out your local True Value for all your DIY needs…they are always ready and willing to help you getter done!
")
Also don’t forget to follow True Value on Instagram for more inspiration! And share your own #DIYaDay projects for a chance to win- they’re giving out prizes all throughout June!

Tracie, Thanks for sharing , I really like how this turned out.
Fun idea!
[…] Bottle Cap Bird Bath @ Cleverly Inspired […]