This is a Sponsored post written by me on behalf of FrogTape brand painter’s tape for SocialSpark. All opinions are 100% mine.
The family room. Do you wonder why I never post about the family room? It is thee hardest room for me to photograph. I feel like I have tried every trick to the trade…I have bounced light with the reflector…I have used my flash on low…I have opened the windows real wide….it is a challenge. It is blue…which tends to absorb light instead of bouncing it…which doesn’t help. But I love this room…it is warm and cozy…comfy in summer and in winter…it allows for plenty of seating…and it has lots of personal touches including tons of trim work that my hubby built. This bookshelf is on the right side of our fireplace. Underneath is tons of storage for board games and kid stuff…the top is stained…and above are bookshelves. They were looking a bit neglected…so I set out to make them a bit more special for fall with the help from my friends at FrogTape painter’s tape") Here is where I started….(btw…color on the wall is Phillipsburg Blue by Ben Moore)
Here is where I started….(btw…color on the wall is Phillipsburg Blue by Ben Moore)") I cleared everything off the shelves and cleaned them off….Hello dust…how are ya? Then with the help of some fabulous Frog tape…I created this wide strip down the center. What is nice about FrogTape is that the edges are water-tight and sealed. You will not have any paint run under the tape ruining your beautiful design….It is perfect for this application.
I cleared everything off the shelves and cleaned them off….Hello dust…how are ya? Then with the help of some fabulous Frog tape…I created this wide strip down the center. What is nice about FrogTape is that the edges are water-tight and sealed. You will not have any paint run under the tape ruining your beautiful design….It is perfect for this application.")
") I love how just a bit of paint and tape can wake up an entire corner. This bookshelf feels special again…here is how I went about creating this look… Supplies: Frog tape paint of choice level measuring tape chalk or pencil
I love how just a bit of paint and tape can wake up an entire corner. This bookshelf feels special again…here is how I went about creating this look… Supplies: Frog tape paint of choice level measuring tape chalk or pencil
1. I took my shelves out because they are removable. Measure and mark the center of your shelves. Measure 2.5 inches on either side of the middle mark.
2. Using level…gently mark a level line from top to bottom creating one wide strip in the center. Place your frog tape pressing to adhere.
3. Mark 1/2 inch from that piece of tape and draw another level line. Tape and press on wall creating a thinner strip on the sides of your wide strip.
4. Once you are all taped up….roll on paint with a small roller. Don’t completely go over the tape …try to just stay on the edges so that the center of the tape will remain adhered to the wall. I did two coats of white.
5. Remove tape while paint is still drying…look at at that fresh clean line!
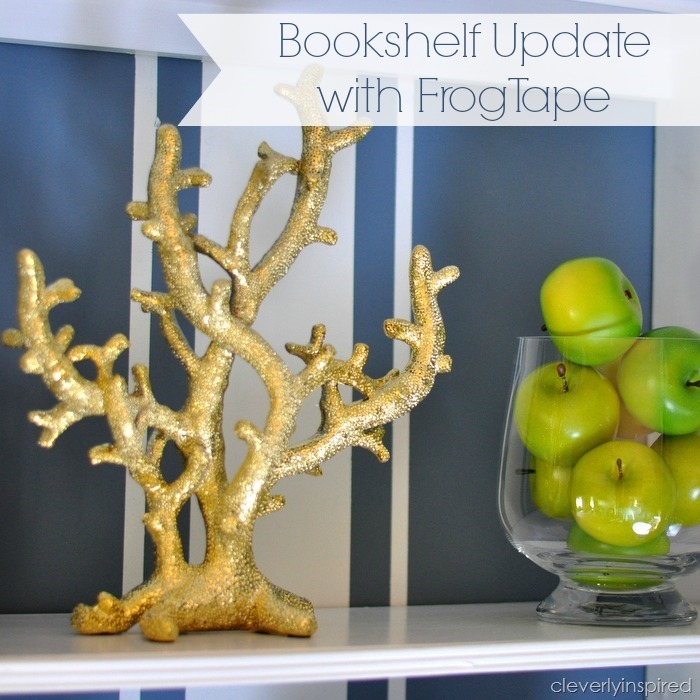
When I was all set to reload the bookshelves I tried to edit a bit… ") I tend to like things symmetrical…so I started by adding back the books that I wanted to keep. Stacking them by color gives them a bit more “presence” and more put together. Then I added the basket up top and balanced that darker color with a wire basket full of pinecones (cinnamon smelling pinecones…bonus!! :) I already had the goodwill bird…but “she” used to black…I sprayed her yellow. She is much happier now;) I balanced the yellow bird with the gold coral thingy…(Home goods) and the fake green apples in a vase. I finished the look off with my family treasures like artwork, and my Grammy’s vase and “captain dude” and our new “old fashion” record player. Nothin like the original ;).
I tend to like things symmetrical…so I started by adding back the books that I wanted to keep. Stacking them by color gives them a bit more “presence” and more put together. Then I added the basket up top and balanced that darker color with a wire basket full of pinecones (cinnamon smelling pinecones…bonus!! :) I already had the goodwill bird…but “she” used to black…I sprayed her yellow. She is much happier now;) I balanced the yellow bird with the gold coral thingy…(Home goods) and the fake green apples in a vase. I finished the look off with my family treasures like artwork, and my Grammy’s vase and “captain dude” and our new “old fashion” record player. Nothin like the original ;).") I think the stripes on the wall make this space so much more special! And how easy! I finished it in under an hour:)
I think the stripes on the wall make this space so much more special! And how easy! I finished it in under an hour:)
To find out more about Frogtape be sure to visit them on Twitter…
Where I share fun ideas:
BeDifferentActNormal, The36thAve, Whipperberry, TipJunkie, Tatertots&Jello, TodaysCreativeBlog, SerenityNow, PositivelySplendid, ByStephanieLynn, TheDIYClub, CRAFT. MadinCrafts. HomeStoriesAtoZ, InspirationGallery
I actually really, really LOVE this! It’s so simple, but it actually makes a very big difference. I kind of want to go try this now! So THANK YOU for inspiring me today with something new!
~Cathy~
Yay!!! You go girl! ;)
it’s interesting that this works-i’d be afraid it would compete with the items on the shelves, but it looks rockin’!
so fun! love that it adds more detail for so little work!