")
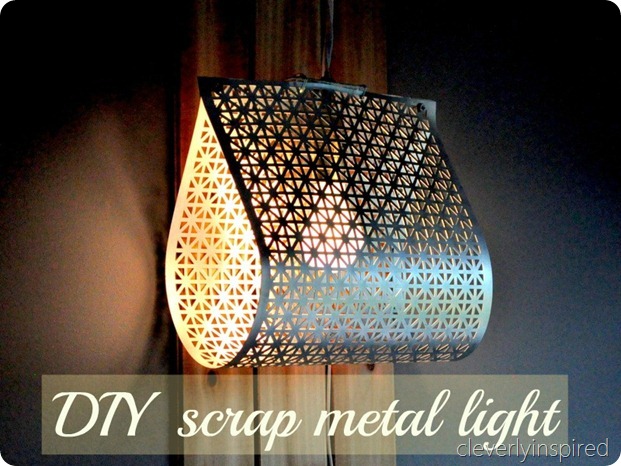
Thanks for the sweet comments on my Preteen boys room. It is such a fun space to be in. One of my favorite projects from this space is this DIY light fixture. I ended up making two and flanking the bed with them. They are hip, unique and so stylish….something you would find in a high end catalog…but for a ton less. Why waste your money when you can make them yourself??
")
Here is what you will need to make your own metal hanging light….A lamp kit, crossbar, wire, No. 8 machine screws, and flat washers (size m5) and 2 sheets of metal. You will find metal sheets in your local hardware store. This is typically used for covering vents. Sometimes you will see screens made from this metal that will cover old radiators. The sheets are precut….and come in several styles. This one I used is called union jack. They run about $8 a piece. You want to be sure that the screws and washers you chose will hold together the metal. My screw fit into an opening and the washer helps it stay put….a nut secures it together on the other side. That is how the light is held together….Let me explain…
")
")
Fold the metal sheet in half and join the tops together……
")
Take a machine screw (with a washer on it first) and place it through a hold close to the end of the sheet. The washer ensures that the screw says put and doesn’t go through the hole.
")
")
Secure the nut on the opposite side. Repeat this with the other end of the metal.
") Now that you have your light secured you can wire in your crossbar in the center. I snugged mine in the center and then wired it on. This crossbar with hold you light bulb in place. You can find crossbars in the lamp repair section of the hardware store.
Now that you have your light secured you can wire in your crossbar in the center. I snugged mine in the center and then wired it on. This crossbar with hold you light bulb in place. You can find crossbars in the lamp repair section of the hardware store.

Now you are ready to wire the light. Take the brass nipple (long threaded piece) and secure it in the center of the crossbar. A nut will screw on to hold it in place.
Take your wires….and from the top…thread them through the nipple and pull out the bottom. Giving yourself enough wire to work with .
Next, thread the wire through the “hat” of the lamp base (pic.4).
You are now ready to “wire” your light. Loosen the screws on either side of the light base. One is silver and one is gold (try not to get the song in your head…”make new friends…but keep the one…one is silver and the other gold….”) moving on…. There are two wires….one is ribbed or grooved and the other is smooth. The ribbed wire gets wrapped around the silver screw. The smooth wire gets wrapped around the gold screw. Needle nose pliers make it easy to make a little loop that can go around the screw…then tighten with a screwdriver so that the wire stays around that screw.
")
When you have the wires secured….place the other end of the “hat” and slide it over the base. (I realize real electrician don’t use the term hat….but it’s how I remember it :) Be sure you have the end that will click into the hat top. Click it all together. Screw it all to the end of the nipple. Pull wires out the top to prevent slack. Congrats you just wired a light!!!!!
")
FYI….I am NOT an electrician….just sharing what I know.

In case you missed it….here is the entire room reveal.
**** Please note….we have this light on a timer and it is only on for short periods (1-2 hours) a night. Obviously metal will heat up…and this light would be best out of the reach of small children. We have a 40 watt bulb in our lights and the metal hasn’t been hot….warm..but not hot . As with all lights and lamps….use caution. Thanks :)

What an awesome idea for a light fixture. They look awesome. There is a lot of inspiration for me here for my boys’ room. Great job!
[…] custom made lighting is one of my favorites. I will have a post coming soon!! So easy, uber chic, cheap and […]
I love this. Looks like something you’d find in Anthropologie. Great job.
This is amazing! Love the way the light shines through the cutouts. I could see using the same material to wrap an existing lampshade frame. Thanks for sharing this!!
wow those are very clever and super chic. lucky boys!!!
DeDe
vintageandflea.com
What a fabulously creative idea!! Impressive and beautiful.
<3 Christina at I Gotta Create!
Wildly Original Round Up party is open!
[…] alınarak yapılmış gece lambası için gerekli malzemeler ve yapılışını resimli olarak burada görebilirsiniz. VN:F [1.9.15_1155]please wait…Rating: 0.0/10 (0 votes cast) Reklam : […]
This looks amazing, so clever, feeling very inspired!
Wow! I LOVE THIS! (Did my excitement come through?) I just pinned it and I’m trying to come up with places in my house where I could hang one. Beautiful, soft, and industrial all at once – bravo!
Very clever indeed! Would never have thought that shape would work but it is darling!
Fabulous project! I’d love it if you’d stop by my linky party and share!
That is indeed a super cool lamp to also be easy to make and inexpensive. Well done!
I love this idea for the lighting! Very modern, yet industrial and very fun!
I love this bright idea (I could not resist;). Great job making this easy with clear instructions. The metal looks so modern chic.
Tracie, what a GREAT idea. My daughter bought her 1st house and is in the process of a complete make over. This light piece you did for your son’s room is fabulous!! Hope you don’t mind that I pinned it on one of my boards!
That looks so cool! Great idea. Thanks for sharing. xoxo
These are terrific…your tutorial is clear, and the pictures are excellent. I pinned this, and I could see these in my boys’ rooms for sure!
Absolutely beautiful! I collect vintage handbags from the 50s and 60s, and there’s something about the design of your light that reminds me of those clean, compact, elegant designs!
These are awesome and so creatively inventive. Great job!!!
Thanks for this awesome idea!
And I laughed so much at the “make new friends but keep the old”! Too late. It’s already stuck in my brain in that wonderful loop!
This is so awesome! I am so jealous of your creativity. I just love the mixture of how industrial the lamp looks, and how vintagey the room is. SO pretty!
Kylie
absolutelyarkansas.blogspot.com
Love it! What a great idea and a great result. These would be great is a loft style condo- don’t you think?
Sorry I left you the wrong link! UGH! Here is the right link: http://kraftykat76.blogspot.com/2012/08/gettin-krafty-with-it_20.html
I am totally going to be stealing this idea! I am moving cross country and these will be a great addition to my home. Thanks for sharing! :D
came over from apartment therapy to check out your diy awesomeness.
i’m no stranger to diy lighting, but these are freaking awesome!!!
[…] it would even be possible to spray paint these and make turquoise ones . . . what do you think? DIY Light Fixture from Cleverly Inspired /* […]
[…] Fotos: cleverlyinspired […]
Your light turned out great! I’ve got this linked to my lamps and lights post too today!
[…] metal sheets for real curve […]
What a fantastic project! I’ll be linking to it on our Lighting & Fans pinboard in the last week of March. Check it out at pinterest.com/homedepot.
– Chante