")
There used to be this Penny Candy Shop where my Grammie lived…. In the summertime she/my mom and dad would give us a dime and we would ride our bikes and fill up our little bags with 10 Swedish Fish. I’m sure it was her and my mom’s way of maybe getting us out of the house for a little bit. We love that shop. It was called Klem’s Penny Candy Shop in Avalon, New Jersey. I wish they still had stores like that that kids could go in and use a dime for a cheap thrill like 10 Swedish Fish.
")
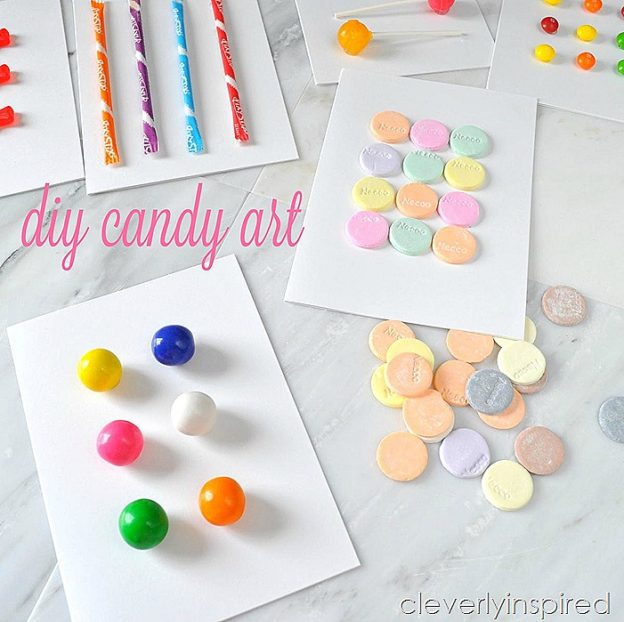
I have always had a deep love for candy. I have had to cut back on my sugar recently…consequently losing about 15 pounds which has made me feel great… but I still enjoy the occasional chewy candy. Life is too short to not enjoy things that you love that much. So when I saw this DIY art idea on Pinterest from fellow blogger I had to create it for the little girls room in Homearama House #15. After the show,this art will be going in my daughter’s room because she too loves candy.
")
Obviously you can switch up this art for your tastes and maybe your favorites in your house. I used buttons, gumballs, dumdums, swedish fish, pixy sticks, wax bottles, necco wafers, skittles, and a FREE PRINTABLE attached on this post:) Right click and print a 5 x 7….
")
I find that candy that will dry out and also has a little bit of color variation is best. This is a great weekend project it comes together really easy and the hardest part is not eating the candy as you go;)
")
For this project you will need:
- 9 white 5×7 frames I found mine on walmart.com and had them shipped to the store.
- You will also need a package of 5 x 7 blank note cards that you can find in the greeting card DIY aisle at Michaels.
- I used hot glue for this because I wanted it to stick immediately and also dry clear and it worked great.
- candy
The blogger who’s project I followed let the candy dry out for a day or two and I tried to do that and then mine stuck to my drying rack so I would say if you’re going to dry it out use wax paper and maybe flip it a couple times. Obviously if it’s a little stale it will glue a little easier so there’s always that to consider. If you don’t have time to dry it out or you just want to go ahead and make it I really don’t think you need to.
Take the glass out of the frames….glue your candy to the cards and let dry. Place in frames and hang up! Easy art!!
Have a great weekend!!
xo