This is a sponsored post. The kind folks at True Value have asked me to share a DIY project with you. I have been compensated for my time and efforts.
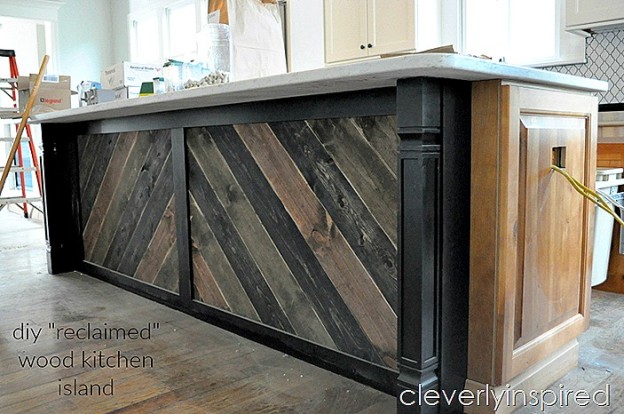
I told you that I have been working with the homeowner that bought one of the houses in Norton Commons that I helped design. Before the house had a contract we had envisioned this kitchen to be very modern farmhouse (in traditional “Tracie” style;). We wanted a mix of old and new….modern but yet soft and lived in. My thought for the large island in the center was to make it look like it has been old piece of furniture that we reclaimed to be the kitchen island.
cv")
It is a large 9 foot piece that is center stage in this kitchen. The cabinetry on the walls are all white with honed black granite counters. For the island we chose to do a hickory stained wood along with a white quartz countertop. The front of the island was a good opportunity to do something unique and unexpected. My inspiration for this design came from this picture.

(source Sarah Richardson Designs)
In the original…the wood is reclaimed lumber in its natural stain/worn down look. For our kitchen we used new 8 inch pine boards that I distressed and made to look old. I have to say that the hardest part of this project would be to cut the wood into this herringbone pattern. We have a great carpenter that I was able to show the picture and he basically recreated it for me. I used 2 shades of Minwax stain (Jacobean, Mahogany) and 1 shade of Rustoleum (ebony). The process is really pretty simple and doesn’t take a whole lot of time to do. Obviously you could use what you have laying around and piece it together. The purpose is for it to look like it goes together but yet look like it was pulled from different pieces overtime. I started with raw wood and just dusted it off well. You want to work fairly quickly and have your equipment ready.

Everything you need for this project can be found at your local True Value hardware store. If this is your first staining project, be sure and ask the store associates for tips—they may even do a little demo for you so that you are feeling more confident. What is so great about this project is that you literally cannot screw it up—the look you are going for is imperfection—perfect right!??
You will need for this project
- rubber gloves
- old rags
- bag of sponge or cheap chipwood brushes
- sander
- 80 grit sandpaper
- tarp to protect floor
- 3 stain colors of your choice
- Enough 8 inch pine boards to complete your project (we had 4 12 foot pieces and we had plenty)

How to:
- Place the boards on some saw horses and wipe dust.
- Dip brush in your first stain and work in sections of about 2 feet.
- Brush the stain on….wipe off excess. Continue until board is stained.
- Continue this process for the other boards with the other stain colors. Let dry.
- Not you are ready to take some of the stain off with the sander.
- Using 80 grit, aggressively sand off edges and surface of board. Move the sander quickly and occasionally wipe with clean cloth to see how the board looks.
- You are ready to cut and install the boards!
- After installation you can coat with a satin poly to protect the finish.
")
An easy afternoon project….for not a whole lotta cash….but makes a big impact! I love how it warms up this island.
What do you think….as good as my original inspiration? Do tell!
This has been a sponsored post by True Value. I have been compensated for my time however all thoughts, ideas, photos and errors are all mine.


Wow, wow, wow Tracie! Congratulations for this great job; it’s just amazing how you managed to do it. It reminded me when I did my kitchen island about two years ago but this one is definitely more challenging.
Thank you for sharing this awesome job.
Anne.
[…] Horseshoe Holders/JoAnneHair/WalMartBed/Concrete Planter/Self Watering Planter/BottleCapBirdBath/Grilled Steak Tacos/3 ingredient crusty bread/Old Fence into a Tray/BarnDoorTVCabinet/Reclaimed wood on island DIY […]