Happy Friday!!! I cannot wait to show you the changes to the beach kitchen!!!
I told you last week that my parents were going to the beach…..you will not believe what they have done to the dated 80’s kitchen. I was sharing on instagram a bit of their progress. They amaze me everyday. I am so blessed to have grown up in a house with such an attitude of “can do”. Their to do list was long…not because I made it long…but because they wanted to see the job done right and not leave it unfinished. My dad is a tad bit of a perfectionist (I didn’t inherit that quality;) When he starts something….he can already see how it will look finished…and he cannot deviant from the task until he sees the vision come to life. I can tell you this….this kitchen will look completely professional.
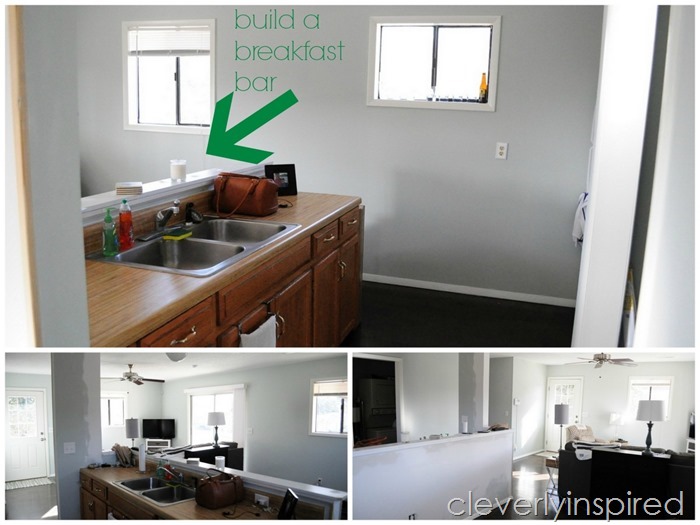
Here are a few pictures that my dad sent…I am so excited to see it in person!!
The first thing they tackled (after my dad removed the old sink) was to build a long breakfast bar on the kitchen ledge. My dad built it out of 3/4 mdf and trimmed out the front and sides. He had to cut an angle on the far left so that the bar wouldn’t impede traffic flow to much…..

I am not exactly sure how he attached the bar to the existing ledge…but I will find out and tell you. We decided to use mdf because he is covering both the existing laminate and the new bar with a product called Spreadstone (told you about that here.) It is a coating product sold online that mimics granite. We went with a gray soapstone finish.
")
It already looks 100% better!!! He had to clamp and piece the bar on the end (it is super long…108 inches I think.) But once it is covered with Spreadstone…you will never know it is pieced together there.
")
After the ledge was constructed….they got to work refinishing the oak cabinets. He took all the doors and drawers off and my mom sanded them down. They sprayed the doors and drawers and rolled on paint to the base cabinets….
")
When everything was painted my dad started the countertop. Basically it is a 6 step process….Sand everything down, coat with primer that comes in the kit, cover with Spreadstone, sand it down lightly, cover with the gloss coat. (I am thinking that is the gist of it…but I am not there doing it myself;)
")
Yes, picture above can be captioned “Original DIYer’s”….how lucky am I?!!?! Seriously the coolest:)
")
I think it looks like a new kitchen!! They are finishing up this week and I will share some pictures soon of the results:) A little before and after teaser below….

Update:
My dad sent some pictures this morning of the countertops….wow wow wow…. My parents seriously rock!

I will let you know about the Spreadstone product after I chat with my dad about it. It is the first time we have used it….so I want to see what his thoughts were about it….It looks amazing though!!

Have a fabulous weekend!! Go Baby GO!!

Looks incredible!! What a transformation!
Looks amazing! Your parents have worked hard…you’re lucky to have them :)
Looks wonderful! Any more info on the spreadstone? We are thinking of using that soapstone color, too. :)
Worked aweseome….will have a post about it next month.:)