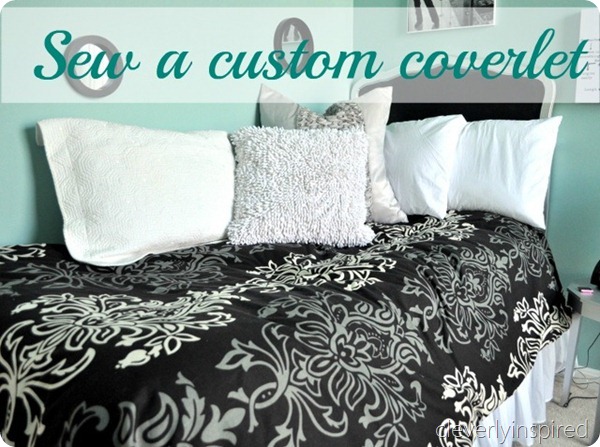

I still walk in my daughter’s new room and smile. I would have loved this room when I was her age! It is such a fun hangout space! When we were looking for a comforter we came up short. There wasn’t much out there…besides zebra print. And neither of us really wanted that. I stumbled upon a fabulous tent sale at a local fabric store. This fabric was marked down to $5 per yard. It was a crazy price for this fabric. Original price on it was $48 a yard. YIKES! Goes to show you that if you see a bit tent outside a very fancy frilly fabric store…give yourself 5 minutes to look…you never know what you may find. I scooped up the last 2 yards and it became my daughter’s coverlet. Here is how I made it….

You need a large space! I used the floor. My daughter’s bed is a twin. The width of this fabric was the perfect size. I didn’t need to cut it or make a seam anywhere. If you are wanting to make a queen…you would have to by double the fabric and seam the fabric together in the center all the way down so that your width would cover the bed. For the backed of my coverlet I used a twin fleece blanket from target. It worked out great because I knew it I used that as a guide it would fit the bed perfect. Plus it’s nice and soft ;) We also used a down comforter under this to use as her main blanket.
Spread and smooth out the fabric. Place the fleece blanket (right sides together) and start pinning. Be SURE to not skip the pinning step!! It is crucial when you are sewing a ginormous piece like this to pin every 4 inches or so….otherwise you are going to end up wanting a drink in the middle of the day. Super frustrated! Pin and be happy I say!


Sew a straight stitch all the way around the piece. Leave an opening large enough to get your hand in there. Turn the piece right side out and smooth out the corners. Fold in the opening and stitch shut.

And you have your custom made coverlet…on the cheap and completely unique!!

Sharing at House of Hepworth, Tatertots and Jello, The 36th Avenue
Great project. I love that you used the fleece for the back. I probably gives it a nice weight as well.
Nice!
I so understand what you mean if you don’t pin…. been there, done that!
I love this, I have been looking forever for my son!! Where did u get the rug love it!!! Thanks