
Do you remember when you were little…and you wanted so badly to pin something up in your room…maybe it was a poster or a good grade or a blue ribbon…and your dad said…”don’t put anything on the wall…I just painted that wall..and it will damage the wall..” but you did it anyway? (sorry, run on sentence there…just thinking out loud) . Well, I remember when my dad and I painted my room (hot pepto pink….I said I loved it when it was going on the wall…and I did love it for about a week…but it was HOLY BRIGHT PINK) Any who, my dad said not to put anything sticky or gluey up on the wall…because it is really hard to come off. Sorry I didn’t listen dad. And after spending the better part of a week prepping the peanut’s old room for paint…I am sorry for anything I may have placed on my wall as a youngin’. Live and learn I suppose.
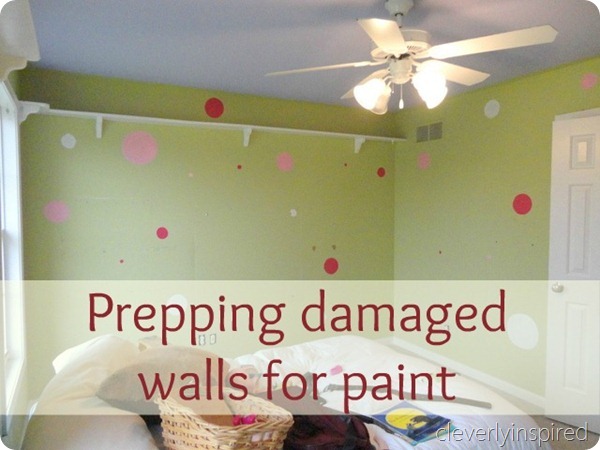
Her walls were a MESS!! Not to mention there were about 400 polka dots that were all “raised” off the wall a bit. Yeap…it’s been a ton of fun getting rid of those. I also had about 489040 holes to cover and patch. The trim in this room is a mess too. Nothin this DIYer can’t handle though! Here is how I prepped the walls…so that I could repaint them again ;)

The before pictures….polka dots…sticky tack…holes from book ledges…a mess….

The carpet is in some awful state….it is on it’s way out and I cannot wait to see it go!!! We are replacing it with this amazing solid maple. It will continue down the hallway too. No…it isn’t the same hardwood as the first floor. Is that illegal?? Ha! Yes, we are crazy like that. We are going with a natural color…eventually..someday…no time soon.. the first floor will need a sand down and we will be going lighter down there too. Do I care they aren’t the same wood? Nope. They will compliment each other great. Quite frankly…that is just how I roll. And I do love this floor.


Here is the design plan…to jog your memory….

So..to prep the walls…here is what you will need…
- Patience.
- A flat puddy knife.
- Drywall repair spackle.
- necessary tools to take out all screws, nails and drywall bolts (pliers and screwdriver)
- Krud cutter cleaner to clean all woodwork.
- warm water with a touch of tsp to clean walls.
- fine grade sand paper
- Patience.
- Time
- Coffee
- Pandora…on your favorite station.
- wine
Ok for reals….To patch any uneven surface on the wall (holes, raised paint areas…etc.) You place some spackle on your puddy knife…smooth in onto the area. Wipe clean with the edge of the puddy knife and repeat until all excess is off the wall and smoothed as much as it can be. After this drys, you come back and sand down the area. Feel with your hand– until the bumps are gone. It may need a couple of coats of spackle to even out the surface. The polka dots in this room all required one coat of spackle and a good sanding.
I followed up this first step with a spray of primer. I used an entire can for just the holes in the wall and the polka dots. The rooms looked like it had a case of chicken pox !


Here is how it looks today. Nice and fresh and clean!! I started with the ceiling. The color is by Valspar and is called Breath of Blue. It is a faint pale pale blue. You can barely tell it is blue. A nice contrast though for the white walls. Two coats on the ceiling.

Then the walls got two coats of Ben Moore Decorator White. It is a white that plays well with any color. It is a perfect white. Pleasing..not too stark…not yellow not gray. Love it. It is the same paint we used in the lakehouse.

Now that the walls and ceiling are done…I am moving onto the trim. OY!! The trim will match the rest of the house…White Umber in a semi gloss by Porter paint.

Floor are installed! I will show you next week ;) If you follow on facebook or instagram…you may get a sneek peek !
[…] what we started with….a bunch of pink and green…and a huge mess! I walked you through how I repaired the walls . That was super fun…or not….Then we had some gorgeous new maple wood floors laid. Yum! This […]